Data Flow
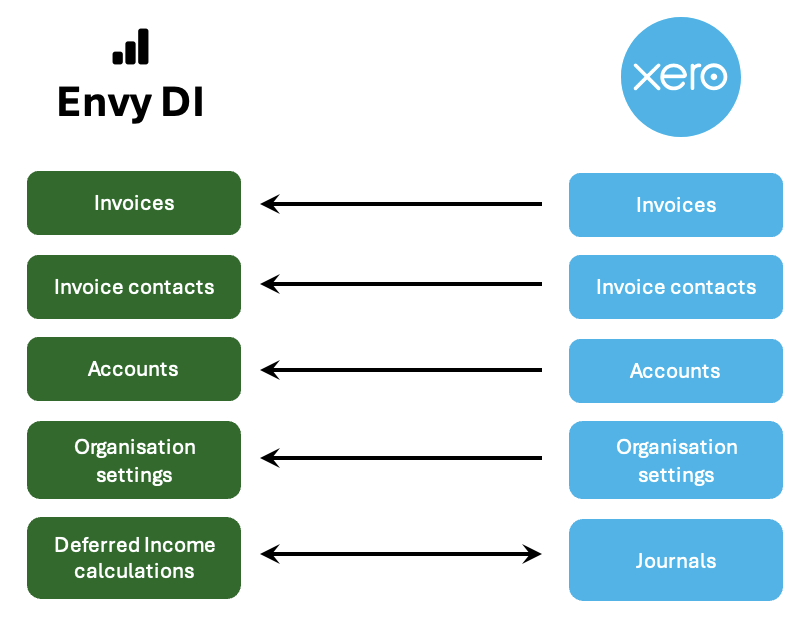
Envy DI communicates with Xero to provide a real-time view of your Organisation’s invoices and to submit Journals in order to update realised and deferred income associated with each invoice. Envy DI also imports invoice contact details to show invoices correctly, account details in order to generate journals and your organisation settings in order to know your base currency.
Getting Started
Initial Set up
Setting income recognition periods
Select the Invoice to Defer
Begin by identifying the invoice you wish to defer. This can be done by searching for or browsing through the list of available invoices from the dashboard screen. You can narrow down the search based on either a date range or the search field. Once you have found the correct invoice, click on it to open the detailed view.
Choose the Specific Invoice Line Item to Defer
After opening the invoice, locate the specific line item that you want to defer. This may require reviewing the various charges or items listed within the invoice.
Input Revenue Recognition Details
For the selected line item, you will need to provide certain details to complete the deferral process:
- Enter the Start Date for Revenue Recognition: Specify the date when revenue recognition should begin for this line item.
- Enter the End Date for Revenue Recognition: Similarly, indicate the date when the revenue recognition should end. This will define the recognition period. The start and end date for revenue recognition must span at least one month end.
- Select the Revenue Recognition Method: You must choose the appropriate revenue recognition method based on the accounting policy or specific needs. Please refer to the separate document or section for a detailed explanation of each available method.
- Daily – revenue recognised will be calculated daily i.e. months with 30 days will have slightly less revenue than those with 31 days etc. First and last month will have revenue calculated based on the number of days that fall in the revenue recognition period in that month.
- Monthly – each month is treated equally regardless of the number of days in the revenue recognition period in that month. Therefore each month has the same revenue recognised.
- Full month – the first and last month will have revenue calculated based on the number of days that fall in the revenue recognition period in that month. Each month in between the first and last month will have an equal amount of revenue recognised in it regardless of the days in the revenue recognition period that fall in those months.
Save the Input
After entering the required information, ensure that you save the data to retain the changes. This step is essential to ensure that all inputs are recorded and calculated properly.
Synchronise with Xero
Once the details are saved, synchronize the data with Xero. This step will automatically create manual journal entries within the Xero system, making the deferral and revenue recognition process seamless for the user.
Generating Deferred Income reports
- Access the Reporting Tab
To begin, navigate to the reporting tab by selecting it from the main menu bar located at the top of each page within the system. The reporting tab is easily accessible and serves as a central location for viewing key financial insights.
- View the Report for Selected Periods and Invoices
Once you have opened the reporting tab, a detailed report will be generated based on the time periods and invoices you have inputted relevant revenue recognition dates for. This report will provide a comprehensive breakdown of important financial information. Specifically, it will show:
- The revenue recognised for each month during the selected period, itemised by individual invoice.
- The Deferred Income (DI) balance for each invoice at the end of every month.
- Analyse Key Financial Data
Within the reporting section, you can quickly and easily review the two critical financial balances being calculated by the system. These two balances are:
- Monthly Revenue Recognition: This section of the report will display how much revenue should be recognised each month based on the selected invoice data. This allows you to track revenue recognition month by month.
- Deferred Income Balance: The report will also show the deferred income balance at the end of each month. This figure represents the portion of income that has not yet been recognised and will be recognised in future periods.
By utilising the reporting section, you will have a clear and structured view of both the recognised revenue and the deferred income balance for the selected periods and invoices. This feature enables you to monitor financial data accurately and ensure that your revenue recognition and deferred income calculations are up-to-date and properly aligned. The figures in the reporting tab can be used to reconcile to Xero to confirm that balances have been booked appropriately.
Sync with Xero
Generating journals
Click on Xero Sync
To begin the process of syncing your data with Xero, locate and click on the "Xero Sync" option in the main menu bar. This menu bar is located at the top of every page within the system, providing easy access to essential features. By selecting "Xero Sync," you will initiate the process of synchronising financial data between your system and Xero.
Ensure Deferred Income Account Setup
Before proceeding with the sync, it is crucial to verify that you have properly set up the deferred income account in Xero. This account will be used to record the deferred income balance on your balance sheet. If you have not yet set up this account, please refer to the separate set of instructions that guide you through this process. Ensuring this step is complete will help you avoid errors during the sync and ensure accurate financial reporting.
Select the Date Range for Synchronisation
Next, choose the date range for the data you wish to synchronise with Xero. This involves selecting both a start date and an end date, defining the specific period over which the deferred income and related financial transactions will be synced. Ensure the dates you select cover the period for which you want to generate deferred income journal entries.
Click 'Generate'
Once you have set the appropriate date range, simply click on the "Generate" button. This will trigger the synchronisation process, creating the necessary manual journal entries for deferred income within Xero. The system will automatically handle the calculations and ensure that the correct deferred income balance is booked to the appropriate account on your balance sheet.
Re-syncing the same period
This process can be rerun as and when required. For months that have already been synced, rerunning the process will void all previous journals in relation to that month and replace them with updated journals based on the information in Envy DI at the time of the new sync.
Note that Envy Di will only be able to push journals in to periods that are unlocked. If a prior period has been locked then Envy DI will only generate and/or replace journals for the unlocked periods. Unlocking all required periods and rerunning the sync process will resolve this issue.
Revenue recognition methods
- Daily – revenue recognised will be calculated daily i.e. months with 30 days will have slightly less revenue than those with 31 days etc. The first and last month in the revenue recognition period will have revenue calculated based on the number of days that fall in the period in those months
- e.g. £500 invoice that should be recognised over the period 30-Sep to 29 Dec in the same year (i.e. over 91 days in total) would have its revenue recognised as follows:
- Sep = 1 day = £5.49
- Oct = 31 days = £170.33
- Nov = 30 days = £164.84
- Dec = 29 days = £159.24
- e.g. £500 invoice that should be recognised over the period 30-Sep to 29 Dec in the same year (i.e. over 91 days in total) would have its revenue recognised as follows:
- Monthly – each month is treated equally regardless of the number of days in the revenue recognition period in that month. Therefore each month has the same revenue recognised.
- e.g. £500 invoice that should be recognised over the period 30-Sep to 29 Dec in the same year (i.e. across 4 separate months) would have its revenue recognised as follows:
- Sep = 1 month = £125.00
- Oct = 1 month = £125.00
- Nov = 1 month = £125.00
- Dec = 1 month = £125.00
- e.g. £500 invoice that should be recognised over the period 30-Sep to 29 Dec in the same year (i.e. across 4 separate months) would have its revenue recognised as follows:
- Full month – the first and last month will have revenue calculated based on the number of days that fall in the period in those months. Each month in between the first and last month will have an equal amount of revenue recognised in it regardless of the days in the period that fall in those months.
- e.g. £500 invoice that should be recognised over the period 30-Sep to 29 Dec in the same year (i.e. across 4 separate months) would have its revenue recognised as follows:
- Sep = 1 day = £5.49
- Calculated on a Daily basis
- Oct = 1 month = £167.58
- Remaining revenue not recognised in first and last month spread equally over intermediate months
- Nov = 1 month = £167.58
- Remaining revenue not recognised in first and last month spread equally over intermediate months
- Dec = 29 days = £159.24
- Calculated on a Daily basis
- Sep = 1 day = £5.49
- e.g. £500 invoice that should be recognised over the period 30-Sep to 29 Dec in the same year (i.e. across 4 separate months) would have its revenue recognised as follows:
Organisation Settings
Deferred Income Account
This account will be used to record the deferred income balance on your balance sheet – it must be a short-term liability account.
This account must be selected before proceeding with a sync of deferred income journals with Xero.
Deferred revenue method
This selection defines how the system defaults to calculating deferred income. This setting is overridden on each invoice line using the dropdown under “revenue recognition method”.
Suppress warnings about revenue changes prior to the Xero locked date
The system automatically raises an error on the Xero sync page when there are periods that have not been synced but for which assumptions have been changed since the last sync. Ticking this box will suppress those warnings.
Disconnect organistaion from Envy DI
Clicking this will break any connections between Envy DI and Xero. This allows the user to have full control over the access Envy DI has to Xero information. Disconnecting Envy DI will mean that the app will no longer be able to calculate deferred income journals. Disconnecting an organisation will not cancel any subscription to Envy DI, which can be managed from the Xero App Store.
User Settings
A user can select which organisation Envy DI logs in to by default. You can either choose a specific organisation or the last accessed organisation.
Frequently Asked Questions
How do I connect to Xero?
Accessing the app from di.envyanalytics.com will direct you through the familiar Xero sign up process. Follow the Xero instructions, which will guide you through connecting the app securely to your organisation’s Xero instance as well as setting up the subscription.
How do I disconnect from Xero?
Go to the “organisation settings” page within Envy DI, accessed using the main menu bar at the top of the app. The organisation settings page contains a link to “disconnect from Envy DI”.
How do I switch between organisations?
Using the dropdown menu in the top right of the app, this will show the current companies name. All connected organisations are presented in the dropdown, simply select the one that you wish to use.How do I select invoices?
The dashboard page of the Envy DI app will automatically show invoices for the default date range – a user can changes this date range to narrow down the invoices they wish to defer as well as use the search field to track down individual invoices by description, invoice number etc. Users can choose to present more invoices per page to help with identifying the relevant invoice.
When and how does data sync occur/how do I find an invoice that I have just issued?
Envy DI provides a real time view of invoices from Xero. Performing a new search for invoices within a date period will instantly show any new invoices in the Envy DI app.
What if I pick a date range that is earlier than the deferral period chosen for the invoice?
Envy Di’s robust logic ensures that anything entered earlier than the invoice date will be handled appropriately.
What if I make a mistake and choose the wrong date range?
All information can be edited in Envy DI as often as required. Envy DI will deal with updating the calculations and then managing the process of booking changes in Xero when the user syncs with Xero.
What if the revenue recognition period includes a locked period in Xero?
Envy DI will not be able to adjust locked periods. Any changes that you make to inputs will be reflected in the unlocked periods that you sync, which may result in inconsistent results being reported in the period after a locked period.
What does the app do when I change my assumptions of previously synced deferrals?
If a user changes the deferred income assumptions and this change impacts a previously synced period, then Envy DI will alert a user on the “Sync Xero” page to the periods that are impacted. The user should then re-sync all affected periods to ensure that the appropriate journals are made in Xero. Envy DI will automatically ensure that previously entered journals are replaced by the updated journals. Envy DI will only do this when a user syncs their changes with Xero, it will not happen automatically.
Is there an audit trail of changes I make to deferral periods for an invoice?
If a change is made in Envy DI and synced to Xero then the “old” journal is replaced by the updated journal. It is possible to see the “old” journal(s) in the voided section of Xero.
Where can I see the postings being made from the app?
Journals posted from Envy DI in to Xero can be seen under the manual journals menu, in the “posted” tab. All journals posted by the Envy Di app will include the following identifier at the start of the description:
** Envy DI ** - [Month] [Year]...
Can I preview before I sync?
It is possible to see the posting that Envy DI will generate in Xero with respect to a particular invoice by navigating to the detailed view of the invoice and then clicking the “Preview deferred income journals for this invoice”
How do I review what Envy Di is calculating and will push in to Xero when I sync?
Use the reporting tab, accessed from the main menu bar at the top of each page. This will present a report which outlines for the periods selected and by individual invoice, the revenue recognised in each month as well as the DI balance relating to each item at the end of each month.
Can I speak to anyone if I need support?
Support can be contacted via app@envyanalytics.com
What is the cost of the app?
Prices start from GBP 10 / AUD 20 / NZD 20 per month. See the Xero App Store for details.
How do I get charged for the app?
Subscriptions to the app are managed through Xero’s subscription mechanism.
How do I cancel my subscription to Envy DI?
Subscriptions to the app are managed through Xero’s subscription mechanism.
Do I lose previously synced journals if I cancel the app?
No, journals will be retained in Xero even if the app is cancelled, however you will lose the ability for the app to manage existing deferred invoices as well as seamlessly handle any new invoices added to Xero that need to be deferred.
How do I reconcile sales data synced to Xero?
Use the reporting section to quickly and easily see what Envy DI is calculating for the two key balances:
- How much revenue should be recognised each month, and
- What the deferred income balance should be at each month end
How are foreign currency transactions handled?
Envy DI uses the exchange rate that the invoice was booked at to translate any foreign currency denominated balances in to reporting currency. This currency is fixed for each invoice and does not fluctuate over time.